Art Bot Walkthrough part 4: Adding the Bot to the Art
Bradley Momberger • •
After Part 3, we had a fully functioning image maker that was saving the canvas to the filesystem as a file. The next steps to actually making this a bot are to set up the connection to Twitter, post the media and the tweet content, and set up recurrence so this runs on a regular basis.
1 Tweeting the Image
Thus far we’ve been concerned only with the creation of the image, but this is also meant to be a Twitter bot, so let’s delve into how that’s done.
1.1 Tweet Content
Since we have some text available to work with in a Tweet, we might as well use it. Many of Mondrian’s works were titled in the form “Composition <identifier> with <colors used>” This is a great idea, because it’s fairly easy to work with the actual canvas to create it.
We’ll start by renaming our fills from their RGB values to “red”, “blue”, “yellow”, and “white” since Canvas understands those values, and adding an object colorsused and setting its properties in the drawing loop.
  var colorsused = {};
  fills.forEach(function(xfills, i) {
    xfills.forEach(function(xyfill, j) {
      ...
      context.fillStyle = xyfill.fill;
      colorsused[xyfill.fill] = true;

      while(++ref_i < i + xyfill.w) { // continue drawing loop
      ...
    });
  });
Then after the loop over fills completes, check what we have for colors used.
  function capitalize(str) {
    return str[0].toUpperCase() + str.slice(1);
  }

  title = "Composition in ";
  delete colorsused["white"];
  colorsused = Object.keys(colorsused).sort();
  switch(colorsused.length) {
    case 0:
    title += "White";
    break;
    case 1:
    title += capitalize(colorsused[0]);
    break;
    case 2:
    title += capitalize(colorsused[0]) + " and " + capitalize(colorsused[1]);
    break;
    default:
    title += "Red, Blue, and Yellow";
  }
We’ll return to this once we have some Tweeting done. It would be cool to number every composition of the same colors, but that requires setting up some data persistence.
1.2 Setting Up Twit
Now that it’s necessary to interact with Twitter, we have to do a few preliminary steps.
- Create a Twitter account https://twitter.com/
- Create an app for the account at https://apps.twitter.com
- Create an access token pair for your Twitter account in the app settings
- Load the keys and tokens into config.json
for Step 2 above, Twitter may require you to provide a mobile phone number to create an app with write permissions. If you already have Two-Factor Authentication set up for your own personal Twitter account (which I recommend) and it’s already tied to your mobile phone, sign up for Google Voice (https://www.google.com/voice/) and set your Google Voice number as your bot’s Twitter account mobile number for as long as you need to set up the app. Once the app is going, you can delete the number from the Twitter account later.
I just snagged the complete and documented config.json from my previous bot Snowclone-a-Minute, removed API_KEY since we’re not using Wordnik, and changed the interval to 86400000 (though this won’t actually be necessary when on Heroku; more on that later).
NOTE ABOUT SECURITY OF YOUR TOKENS
If you, dear reader, decide to grab a fork of this source code from Github and try it out for yourself, I implore you to make a private, non-tracking Git branch to hold a single commit that contains only adding the keys and tokens to config.json. You don’t want to accidentally push these to Github; you also don’t want to do it purposefully.
Anyway, let’s go ahead and import the config into our script. Node.js has a nice feature that you can import a JSON file as an object with require().
var config = require("./config.json");

var consumer_key = config.consumer_key;
var consumer_secret = config.consumer_secret;
var access_token = config.access_token;
var access_token_secret = config.access_token_secret;
Now to set up the twitter client, we add in the Twit library with var Twit = require("twit");, and create an instance with the OAuth tokens preconfigured.
  var T = new Twit({
    consumer_key:     consumer_key,
    consumer_secret:  consumer_secret,
    access_token:     access_token,
    access_token_secret: access_token_secret
  });
The variable T now represents a customized interface to the Twitter API just for our app and account.
1.3 Media Upload and Posting Tweet
Twitter allows uploads of media, which can then be referenced when making other tweets.
For the code below, it’s worth pointing out that all of the routine that we’ve been building up through this is now encased in the function createCanvas(). Though the canvas object itself is global in the script, createCanvas() returns it as a convenience.
Twitter really just needs the image data in step 1. There’s no other required payload value in the API docs for media/upload. Base64 encoding (which converts all the binary data into plain text) is the preferred method of passing the binary data as string, and the toBuffer() function in the Canvas object returns the binary blob of the canvas’s PNG representation. Thus, the “media” property below will contain a Base64 string representing the contents of the canvas as a PNG file.
  function makeTweet(){  // first we must post the media to Twitter
    T.post(
      'media/upload',
      { "media": createCanvas().toBuffer().toString('base64') },
      function (err, data, response) {

      if(err) {
        console.error(err);
        if(~process.argv.indexOf("-once")) {
          process.exit(0);
        } else {
          throw err;
        }
      }
      ...
If we made it past the error check above, then we got back an object that contains the media_id. Pass it to a Tweet object in the media_ids property (boxed up into an array as the API requires) and the rest is just a post to statuses/update. The function from above continues below.
      ...
      // now we can reference the media and post a tweet (media will attach to the tweet)
      var mediaIdStr = data.media_id_string;
      var params = { status: title, media_ids: [mediaIdStr] };

      T.post('statuses/update', params, function (err, data, response) {
        console.log(data);
        if(~process.argv.indexOf("-once")) {
          process.exit(0);
        }
      });
    });
  }
Places where we refer to ~process.argv.indexOf("-once") are checks to how the script was invoked from the command line. A command-line argument of -once means that the script should only execute once instead of staying alive. If run on your own server, for example, the easiest deployment would be either a cron job running this script with -once every day, or running the server without -once but with some baked-in intervals that would manage their own recurrence.
1.4 Intervals
Let’s go ahead and add those recurrence intervals in case we want to use them. The code below will run makeTweet() every day, and ping this script every five minutes to keep it alive.
  makeTweet();
  if(!~process.argv.indexOf("-once")) {
    setInterval(makeTweet, config.interval || 86400000);

    //here we just ensure that the app doesn't sleep by pinging it every five minutes.
    //  If we didn't keep the app alive, it wouldn't wake up to run the interval function
    //  at the appropriate interval.
    setInterval(function() {
      http.get({ hostname: "localhost", port: process.env.PORT })
    }, 300000);
  }
However, we haven’t actually set up anything to respond to HTTP requests. Some hosts, like Nodejitsu, require this for Node deployments to run at all. Heroku will take down any Web dyno that doesn’t start listening on the port supplied by the environment variable $PORT within 60 seconds of startup. So we’ll add in a quick and simple Express.js responder.
 if(~process.argv.indexOf("-server")) {
   var express = require("express");
   var app = express();
   app.get('/', function(req, res){
     canvas.toDataURL('image/png', function(err, str){
       res.send(
         '<h1><a href="https://twitter.com/neoplastibot">@neoplastibot</a></h1>'
         + '<h2>last image: "' + title + '"</h2><img src="' + str + '">'
       );
     });
   });
   try {
     app.listen(process.env.PORT || 8080);
   } catch(e) {
     console.error(e);
     //continue app. just forget about serving web
   }
 }
Neat thing that we’re doing here is inlining the canvas data into an <img> tag using toDataURL() so we don’t have to muck around with the filesystem and serving files. The simple page that gets returned shows the title and image of the most recently created image.
2 Deploying to Heroku
A brief intermission now, for the steps to get started on Heroku. We’ll need these things:
- A Heroku account: https://heroku.com/
- The Heroku command line “Toolbelt”: https://toolbelt.heroku.com/
- Billing set up on the Heroku dashboard (everything we are doing for deployments is gratis, but billing is required for add-ons regardless of whether they’re free plans or not)
- A Heroku application set up from the Web interface or the Toolbelt (I prefer the Web interface for this).
The following box shows the set of commands to get started, adapted from the official Heroku instructions when you create an app from the Web interface:
Clone the app source from Github
Start with a directory of the app that we can set up Heroku with
$ git clone git@github.com:airhadoken/neoplastibot
Install the Heroku Toolbelt
Download and install the Heroku Toolbelt or learn more about the Heroku Command Line Interface.
If you haven't already, log in to your Heroku account and follow the prompts to create a new SSH public key.
$ heroku login
Create a new Git repository
Initialize the remote git repository for Heroku
$ cd neoplastibot/
# Here "neoplastibot" is the Heroku app name, not the folder name.
# App names are unique in Heroku so future clones will need a different name.
$ heroku git:remote -a neoplastibot
Deploy your application
First set up a private branch so you don't accidentally push your private config to Github
$ git checkout -b private/master
$ # use your favorite text editor to edit config.json below.  I like Sublime.
$ open -a "/Applications/Sublime Text.app" config.json
After editing config.json according to the documentation contained within, commit your code to the repository and deploy it to Heroku using Git.
$ git add -u
$ git commit -m "PRIVATE values for config.json"
$ git push --set-upstream heroku private/master:refs/heads/master
2.1 A Note on Buildpacks
UPDATE 2016-01-19: Heroku now has native support for multiple buildpacks. This section is saved for legacy purposes, but be advised that instead of doing all this, it will be possible to do
heroku buildpack:add https://github.com/mojodna/heroku-buildpack-cairo.gitafter setting up a new cedar-14 instance. For more, see https://devcenter.heroku.com/changelog-items/653
To use node-canvas, certain system libraries have to be installed on the host system at a deeper level than node packages go. Heroku’s cedar environment doesn’t contain all of the necessary libraries to support the building of the node-canvas module, so we’ll have to make some lower level changes to the config. Heroku uses the concept of “buildpacks” to put together all the needed libraries for execution, and we’ll have to make use of this to add the libraries we need as a buildpack.
- Make sure your Heroku stack is Cedar-14, not Cedar-10.
$ heroku stack
=== neoplastibot Available Stacks
  cedar-10
* cedar-14
- Change the buildpack with this command:
$ heroku buildpack:set https://github.com/ddollar/heroku-buildpack-multi.git
The “multi” buildpack we’re setting here isn’t a usable buildpack by itself, but it allows for several other buildpacks to be fused together into one. In the .buildpacks file in the app’s home directory, we have the following two lines:
https://github.com/mojodna/heroku-buildpack-cairo.git
https://github.com/heroku/heroku-buildpack-nodejs.git
This instructs the multi buildpack to combine the default Heroku pack for NodeJS (which Heroku would otherwise use as the default once you tried pushing a Node app with a package.json) with a buildpack that contains all of the missing but necessary libraries to build node-canvas (pango, cairo, harfbuzz, freetype, giflib, pixman, and fontconfig). Between these two we have a working NodeJS environment with canvas support.
2.2 Setting Up a Cron Job
Note that the Web service described above is encased in a check for the -server command line argument. I want to preserve it for occasional debugging, but I also don’t need it running for the most part. So instead of running a Web dyno as is default.
Extra Note about Web Services:
I do want to point out that Heroku can be a bit confusing with respect to how dynos operate. In theory, Web dynos start automatically when you deploy your Node app without a Procfile, but I find the automatic startup to be hit-and-miss. If you are running into problems with automatic startup and need to manually start a Web dyno, first add a spec for the Web dyno to the Procfile.
web: node app.js -serverThen you must also scale your Web dynos to include one running dyno.
$ heroku ps:scale Web=1
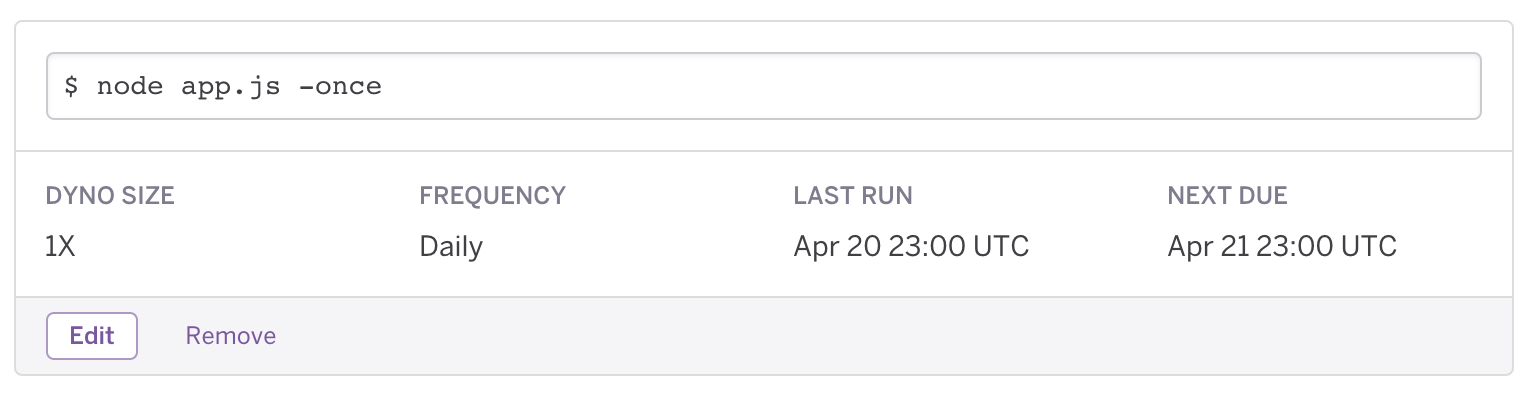
What we’re going to do now is add an add-on that runs tasks regularly, and run our script with the -once flag to just Tweet out the canvas and exit.
$ heroku addons:add scheduler:standard
Now we can go to the dashboard for the scheduler at https://scheduler.heroku.com/dashboard and add a daily job that runs the script with -once.
All I really need for the bot’s regular operation is this cron job, so now that it’s set up I won’t bother running the Web server. But the math does seem to support running both a Web server and a cron job if you need to. Heroku gives all apps 750 free dyno-hours per month. That’s 31.25 days, so if you run the web dyno constantly, you still have 6 free hours to run scheduled tasks.
At this point we have:
- A script that creates a random painting on canvas.
- An app deployed to Heroku that makes a Tweet daily based on this script, based on a cron job.
- Support for running as a full Web server if needed.
That’s a win.
3 Adding Statistics
Returning now to Section 1.1, we were able to create a title for the canvas image based on the colors used, but not serializing over the lifetime of the app. We may have hundreds of “Composition in Red, Blue, and Yellow” images over the lifetime of this bot, and some more unique identification would be nice.
Heroku doesn’t allow for persistent filesystem objects – the app deployment directory is ephemeral and gets rebuilt from scratch on each deployment – so it’s not quite as easy as writing a stats.json to the filesystem and expecting it to be available for the lifetime of the bot. What we’ll need is a lightweight persistent data store, ideally one that is easy to query for a JS object and take JS objects as input. MongoDB is ideal for exactly this, and MongoLab has a Heroku add-on with a gratis “Sandbox” level of service.
To get started we’ll add this add-on to the app, and launch the admin interface.
$ heroku addons:add mongolab:sandbox
$ heroku addons:open mongolab
Now through the MongoLab web interface, we’ll do the following steps:
- Create a DB user (this is not the same as the MongoLab admin account autmoatically generated for your DB – that account won’t be able to log in except through the Web interface)
- Add the URL for your MongoLab DB (with its username, password, host, port, and DB name) to
config.jsonin themongo_urlproperty - Create a collection “stats” in your DB.
- Add one object to your stats collection. If just starting out it will be empty, but I had a few pieces already Tweeted by the time I got here, so I added a few keys by default.
Now, when the object is retrieved from the collection using findOne({}, ...), we’ll get an object like this:
{
    "_id": {
        "$oid": "[REDACTED]"
    },
    "Red": 2,
    "Blue and Yellow": 2,
    "White": 1,
    "Red, Blue, and Yellow": 4,
    "Yellow": 1
}
The following process now happens near the end of the script. We’ve encased the Web service setup and construction/Tweeting of the canvas in a function startService() (not shown in this post), and now we’ll wait for that stats object to load before kicking the process off:
var stats;
var mongourl = config.mongo_url;
  if(mongourl) {
    MongoClient.connect(mongourl, function(err, db) {
      if(err) {
        console.error(err);
        startService();
      }

      var collection = db.collection(config.mongodb_collection);
      collection.findOne({}, function(err, s) {
        if(err) {
          console.error(err);
        } else {
          stats = s;
        }
        db.close();
        startService();
      });
    });
Now we have the stats object after the canvas is created, so the title creation changes like this.
  delete colorsused["white"];
  colorsused = Object.keys(colorsused).sort();
  switch(colorsused.length) {
    case 0:
    title = "White";
    break;
    case 1:
    title = capitalize(colorsused[0]);
    break;
    case 2:
    title = capitalize(colorsused[0]) + " and " + capitalize(colorsused[1]);
    break;
    default:
    title = "Red, Blue, and Yellow";
  }

  if(stats) {
    stats[title] = stats[title] || 0;
    stats[title]++;
    title = "Composition " + stats[title] + " in " + title;
  } else {
    title = "Composition in " + title;
  }
And of course, we want to update the stats as we go along, so a simple update of the stats object we already got (it can update itself since it has an “_id” property) is all that’s required.
  if(mongourl) {
    MongoClient.connect(mongourl, function(err, db) {
      if(err) {
        console.error(err);
      } else {
        var collection = db.collection(config.mongodb_collection);
        collection.update({"_id": stats._id}, stats);
      }
    });
  }
That’s all that’s required. Stats are now deployed. Bot is finished and beautiful.
4 Conclusion
This series was intended to capture the process of turning ideas into working processes. At the beginning of Part 1 we started experimenting with canvas drawing, and at the end of this part we had a functioning Twitter bot. This represented several weeks of actual effort, and many steps of failure were not reflected in this series. The creation process isn’t always easy, and frustration creeps in when things don’t work as expected with no easy fix. Case in point: when I started trying to deploy to Heroku, pango was not part of the Cairo buildpack mentioned in section 2.1, and I spend 12 hours or so making a build of pango on the Heroku deployment and respecting the existing additional libraries in the buildpack, so I could package it up and add it to the buildpack’s Docker scripts and thus re-enable node-canvas.
Fortunately, I am pretty stubborn when I want something to run, and this turns out to be a virtue in software. It means that I don’t necessarily need to scale down my vision when trying for something ambitious. However, it would be fallacious to think that it’s wrong or a cop-out to make things simpler and achieve just part of a vision; in fact, it’s usually better to have a something that works partially than to have a nothing that works perfectly. Darius Kazemi (@tinysubversions) wrote pretty much the definitive piece on preferring small working things over large things that perfectly reflect a vision. I’m not in the habit of making more than one thing per week, but I am in the mindset that when you have accomplished 10-12 things in a category, no matter how small, you can rightly say that you understand a project area. So get some bot ideas and make bots. Make art. Make art bots or non-art bots or non-bot art. Just make, and put it out there, and repeat forever.