Art Bot Walkthrough Part 3: Tying It Together
Bradley Momberger • •
0: Retrospective
Last time we took some detours to try to figure out how to better draw a grid with jitter in both the horizontal and vertical dimensions. We tried backtracking to the left and upwards from cells in the bottom right, but it caused odd overlaps. In the end, after a few failed attempts, a better method was called for.
1: Proposed revision: fills with NxN
Reverting the fills to either white or a color, removing “left” and “top” as valid fill types, instead we now pick random points in the (x, y) table to have lengths and widths possibly greater than 1.
var xd, yd;
count = Math.floor(
  Math.random() * xparts.length * yparts.length * (1 - 1 / Math.E)
) + 4;
while(count--) {

  xp = Math.floor(Math.random() * xparts.length);
  yp = Math.floor(Math.random() * yparts.length);
  xd = Math.floor(Math.pow(Math.random(), 3) * (xparts.length - xp) + 1);
  yd = Math.floor(Math.pow(Math.random(), 3) * (yparts.length - yd) + 1);

  if(typeof fills[xp][yp] === "string") {
    fills[xp][yp] = [fills[xp][yp]];
  }
  fills[xp][yp][1] = xd;
  fills[xp][yp][2] = yd;
  (function() {
    var i, j;
    for(i = 0; i < xd; i++) {
      for(j = 0; j < yd; j++) {
        if(i + j > 0) {
          fills[xp + i][yp + j] = null;
        }
      }
    }
  })();
}
And the fill operation now removes the backtracking in favor of forward-tracking. Where the fill string has been replaced by an array, we add to the total width and height of the rectangle to draw by adding up the relevant subsequence of xparts and yparts. When the fill is null, we can conclude that another fill has already covered its associated area of the canvas.
fills.forEach(function(xfills, i) {
  xfills.forEach(function(xyfill, j) {
    var xoff = asum(xparts.slice(0, i)),
        yoff = asum(yparts.slice(0, j)),
        w = xparts[i],
        h = yparts[j], ref_i = i, ref_j = j;

    if(!xyfill)
      return;

    if(typeof xyfill === "string") {
      context.fillStyle = xyfill;
    } else {
      context.fillStyle = xyfill[0];

      while(++ref_i < i + xyfill[1]) {
        w += xparts[ref_i];
      }
      while(++ref_j < j + xyfill[2]) {
        h += yparts[ref_j];
      }
    }

    xoff += (i ? 7 : 0);
    yoff += (j ? 7 : 0);
    w -= (i ? 7 : 0);
    h -= (j ? 7 : 0);

    context.fillRect(xoff, yoff, w, h);
  });
});
This is still not a watertight solution. After a couple of trials and some time spent considering the problem, I’m fighting the urge to just fix this already and not talk about what’s wrong, so bear with me. What’s wrong here is exemplified by this graph where r = red, w = white, b = blue, y = yellow:
| w,1,1 | w,2,3 | w,1,1 | r,1,2 | y,1,2 | r,1,1 | |
| b,1,1 | w,1,1 | y,1,1 | ||||
| y,2,1 | w,1,1 | b,2,1 | r,1,1 | |||
| y,1,1 | r,1,1 | w,1,1 | ||||
| w,2,1 | w,1,1 | y,1,1 |
Some things happened here that we didn’t expect:
- The large rectangles (meaning anything larger than 1x1) overlapped in what they covered.
- The overlap in large rectangles sometimes changed a block that was defining a large rectangle to a null value
- No colors from the last line are shown because there was less than 7px for the last line (this is maybe less of a problem but I’m stating it to avoid confusion)
The product ended up looking like this:
2: Tagging
In the previous example, we didn’t account for the fact that the large rectangle we forced into the fill matrix might block out another large rectangle from being created near it. The randomizer was tasked with choosing a length and width within the distance to the end boundary, but not with choosing a width within the distance to any neighboring large rectangles.
It was an easy calculation to figure out how far we could go to the boundary, so we didn’t bother inlining it into the matrix data. Now we should probably do that, so that when a large rectangle is dropped in, we can update the distance we can grow for a large rectangle without overlapping anything.
For starters let’s change our basic fill to use an object instead of a tuple for clarity (all contained values now have names). The code to start the grid is now this:
var fills = [];
xparts.forEach(function() {
  fills.unshift([]);
  yparts.forEach(function(yp, y) {
    fills[0].push({
      fill: "rgb(255, 255, 255)",
      w: 1,
      h: 1,
      wmax: fills.length, // x direction is done in reverse with unshift()
      hmax: yparts.length - y
    });
  });
});
Now when the color randomizer wants to change a fill color, the operation becomes fills[xp][yp].fill = fill;, an easy change. When the rectangle size randomizer wants to change a fill size, though, it needs to update more data.
2.1: Randomizer
At the same time we’re doing this update, it would be a good idea to just skip over large rectangles that have already been defined. We’re going to change how we choose x and y parts this way:
while(count--) {

  // start with a random number of iterations
  p = Math.floor(Math.random() * xparts.length * yparts.length);
  xd = 0;
  yd = 0;

  // choose a random start point.
  while(p--) {
    xp++;
    if(xp >= xparts.length) {
      xp = 0;
      yp = (yd + 1) % yparts.length;
    }
    if(!fills[xp][yp].fill || fills[xp][yp].w > 1 || fills[xp][yp].h > 1) {
      p++; // large rectangle found. Don't count this iteration.
    }
  }
  . . .
}
This has a problem, wherein the p value might never reach zero if all blocks are either already part of a larger merged cell or unable to grow. One way to fix this is to have a sanity check that drops out when an excessive number of large blocks are hit.
  while(p-- && sanity) {
    xp++;
    if(xp >= xparts.length) {
      xp = 0;
      yp = (yp + 1) % yparts.length;
    }
    if(p < 1
       && (fills[xp][yp].fill == null
           || fills[xp][yp].w > 1
           || fills[xp][yp].h > 1
           || (fills[xp][yp].wmax < 2 && fills[xp][yp].hmax < 2)
           )) {
      ++p; // large rectangle found. Maybe don't count this iteration.
      // But also don't let it loop forever if we run out of blocks to play with.
      --sanity;
    }
  }
For this to work, we also add 1 to the randomized value of p, to make sure this block always runs at least once (this could also be accomplished with a do...while loop). Without it, we might fail a sanity check on one iteration, never run this block on the next iteration because p gets randomized to 0, and then (because sanity was reset to nonzero) draw the block we skipped out on anyway. This is not a good idea and would likely cause some black blocks to show up, and furthermore took me a day to figure out why it was happening.
p = Math.floor(Math.random() * xparts.length * yparts.length) + 1;
The rest of the while(count--) { ... } loop is encased in if(sanity > 0) { ... }, because it can be reasonably concluded that if the sanity check hits 0, there wasn’t an appropriate (xp, yp) pair found to start a large block.
2.2 Calculating xd and yd based on wmax and hmax
A simple change to what we did before, with the addition of not letting 1x1 resizings happen (because that’s boring). The wmax and hmax properties now dictate the maximum values to choose. We still use a cubic randomization over [0, 1).
  if(sanity > 0) {
    do {
      xd = Math.floor(Math.pow(Math.random(), 3) * fills[xp][yp].wmax + 1);
      yd = Math.floor(Math.pow(Math.random(), 3) * fills[xp][yp].hmax + 1);
    } while(xd < 2 && yd < 2); // Recalculate if we didn't grow the rectangle.
  ... //continued in section 2.3
2.3 Recalculating hmax and wmax
Enhancing the block drawing function, we now start our i and j iterators at 0 instead of the values of xp and yp so we can look above and to the left of the large block we’re adding. When we’re above the block, we reset hmax to the vertical grid distance to our origin’s row (yp - j), and when to the left, set horizontal distance to the column (xp - i) if they’re less than what’s been set for the cell already.
    (function() {
      var i, j, k;

      for(i = 0; i < xp + xd; i++) {
        for(j = 0; j < yp + yd; j++) {
          if(i >= xp && j >= yp) {
            if(i > xp || j > yp) { // don't null the upper left corner
              fills[i][j].fill = null;
            }
          } else if(i >= xp) { // vertically above the new block
            fills[i][j].hmax = Math.min(yp - j, fills[i][j].hmax);
          } else if(j >= yp) { // horizontally left of the new block
            fills[i][j].wmax = Math.min(xp - i, fills[i][j].wmax);
          }
        }
      }
    })();
    fills[xp][yp].w = xd;
    fills[xp][yp].h = yd;
  }
3 Other Enhancements
Before the hmax and ymax recalcuation, we’ll also drop in a quick check for our block size if it’s 2x2 or larger, because a lower row may not be able to go as far across as the origin’s wmax nor may a rightwards column be able to go as far down as the origin’s hmax. You could go across and look at each cell’s hmax and down looking at each wmax, or (as the code below does) iterate all the cells in a candidate block to check whether they’ve already been committed to another large block, adjusting the column and row spans based on which one is larger (in other words, preferring squarer rectangles than less square ones).
      var i, j, k;
      // first pass: check for wmax/ymax differences in rows and columns if block is 2x2 or greater.
      for(i = xp + xd - 1; i > xp; i--) {
        for(j = yp + yd - 1; j > yp; j--) {
          if(fills[i][j].fill == null || fills[i][j].w > 1 || fills[i][j].h > 1) {
            //special case -- another row/column in our block has a lesser wmax/hmax than our origin
            if(xd > yd) {
              xd = i - xp;
            } else {
              yd = j - yp;
            }
          }
        }
      }

    for(i = 0; i < xp + xd; i++) { // hmax/ymax calculation starts here
Also, because we don’t want completely blank rows and columns, it’s a good idea to limit the wmax of row 0 cells and the hmax of column 0 cells to one less than the full width/height. Change the initial building of the grid to this:
  var fills = [];
  xparts.forEach(function(xp, x) {
    fills.unshift([]);
    yparts.forEach(function(yp, y) {
      fills[0].push({
        fill: "rgb(255, 255, 255)",
        w: 1,
        h: 1,
        wmax: fills.length - (x === xparts.length - 1 ? 1 : 0), //x direction being done in reverse
        hmax: yparts.length - (y === 0 ? 1 : y)
      });
    });
  });
And that’s enough to create some really solid output. The only thing that might be left to do at this point is tweak the randomizing values to slighly tweak results.
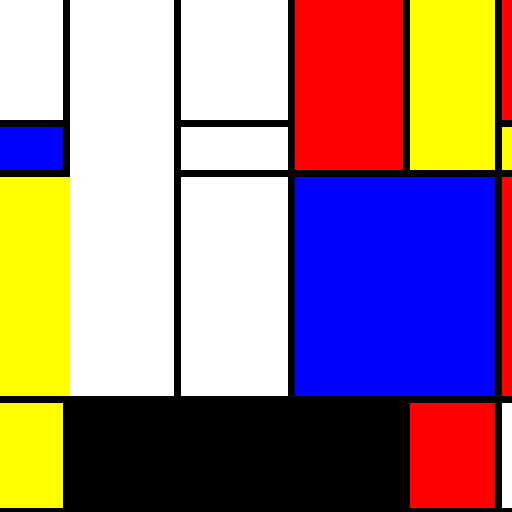
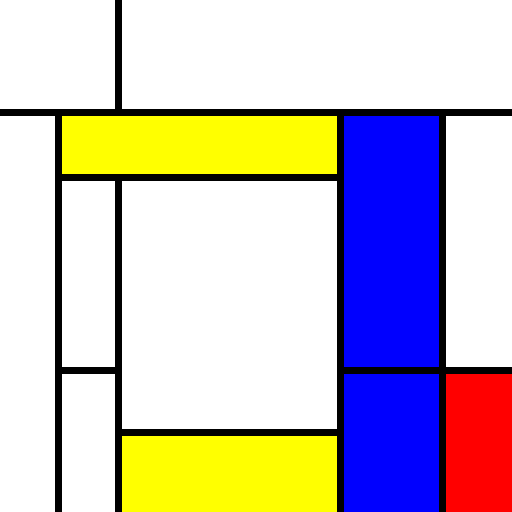
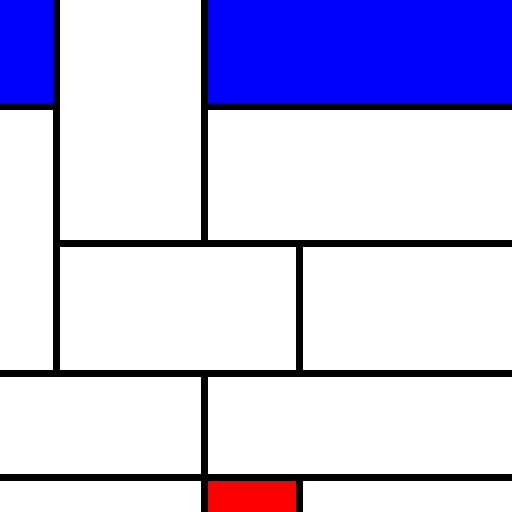
4 Some sample output
These look great! It’s really getting to the idea we have been trying to express. (This is the output of three consecutive runs):

5 Next steps
In the next post we’ll go over the grunt work of setting up the bot to Tweet the results, and then deploy and run the bot on a recurring basis.
There were some serious setbacks in getting the deployment right, which is why I’ve decided to break out the deployment into a new post, but I’ve learned quite a bit in the last 24 hours so I hope it will be illustrative.